JUMP TO RECIPE![]() SAVE RECIPE
SAVE RECIPE

The finest! Depending on the type of day we’ve had, I prepare them for breakfast, lunch, snacks, or dinner. Yields: 8 serving(s) PREP TIME: 10 min. COOK TIME: 10 min. TOTAL TIME: 20 min.
Ingredients
- 2 c. All-purpose Flour
- 3 tsp. Baking Powder
- 1/2 tsp. Salt
- 1/4 c. Sugar
- 1 1/2 c. Milk
- 2 whole Egg Yolks
- 1 tbsp. Vanilla Extract
- 1 tsp. (additional) Vanilla Extract
- 1 stick (1/2 Cup) Salted Butter, Melted
- 4 whole Egg Whites
See Nutritional Information
Directions
![]() SAVE RECIPE
SAVE RECIPE
- Preheat the waffle iron to the regular setting.
Sift together the flour, baking powder, salt, and sugar in a bowl.
In a separate bowl, whisk together milk, 2 egg yolks, and vanilla. Pour over the dry ingredients and very gently stir until halfway combined. Pour in the melted butter and continue mixing very gently until combined.
In a separate bowl (or using a mixer), beat the egg whites with a whisk until stiff. Slowly fold them into the batter, stopping short of mixing them all the way through.
Scoop the batter into your waffle iron in batches and cook according to its directions (lean toward being a little deep golden and crisp!) Remove and serve immediately with softened butter and warm syrup.
 12575055295_a360b153bd_z.jpg for post 11684")
Oh my GOSH, I love waffles. We had them a couple of times when we were in Colorado, and no offense to pancakes or anything…but I was reminded just how lovely good waffles are.
Once I got home from the trip, I decided to make waffles.
Then I made them again.
Then I made them again.
Then I made them again.
I fiddled and fiddled (much to my family’s profound bliss) and here’s the resulting recipe, which darn well better be perfect because I’m not making waffles again any time soon. Until tomorrow.
Anyway, next time you have a hankering for waffles, fire up the waffle iron and give these beautiful babies a try. (If you don’t have a waffle iron, you can thin the batter with just a little milk and make pancakes.)
 12575562594_1cdefbebdc_z.jpg for post 11684")
Set a sifter into a bowl.
 12575561094_330d156ccd_z.jpg for post 11684")
Add flour…
 12575559124_77f7e86ddb_z.jpg for post 11684")
Baking powder…
 12575105255_bde3277f0b_z.jpg for post 11684")
Sugar…
 12575103615_9093c17487_z.jpg for post 11684")
And a leetle salt.
 12575102205_a52648e453_z.jpg for post 11684")
In a separate container, measure the milk…
 12575100855_74395bcde8_z.jpg for post 11684")
Then separate four eggs, placing the egg whites in a separate bowl…
 12575099635_c072b66ea3_z.jpg for post 11684")
And adding just 2 of the egg yolks to the milk.
This is really where my fiddling came into play this week. I started with 3 eggs and used all of the whites and yolks. Then I repeated with 3 eggs but only used 2 of the yolks. I ultimately went with 2 yolks and 4 whites because that texture wound up being the most heavenly, although I realize having 2 leftover egg yolks might upset some human beings’ sense of symmetry and order. And for that, I send my love and apologies.
 12575195723_5fe4e66311_z.jpg for post 11684")
Next, add in a good amount of vanilla for flavor…
 12575537724_2c2c51ac9c_z.jpg for post 11684")
Then whisk the mixture together and set it aside.
Note: You can sub buttermilk for milk, or you can add a teaspoon of white vinegar to the milk and let it sit for 5 minutes to turn into buttermilk.
 12575549854_af15a2ca6f_z.jpg for post 11684")
Sift the flour, baking powder, sugar, and salt together…
 12575097025_10ee803ecc_z.jpg for post 11684")
And set it aside.
 12575089695_673d7cf410_z.jpg for post 11684")
Next grab a stick of salted butter…
 12575539644_9ae0270328_z.jpg for post 11684")
Put it into a microwave-safe bowl…
 12575085095_af0c255b0c_z.jpg for post 11684")
And nuke it for 30 seconds or so, till the butter’s melted.
 12575182933_2ceeddd96a_z.jpg for post 11684")
Finally, whisk/beat the egg whites…
 12575533144_c2ed267e94_z.jpg for post 11684")
Until you think your arm has fallen off…
 12575074835_689ae58392_z.jpg for post 11684")
Or until they’re stiff. These actually aren’t to the “stiff” stage yet, as I tried them with soft peaks in this batch of waffles. Ultimately, I decided they needed to be beaten all the way…so just keep going until you think your arm has not only fallen off, but that it’s on the floor in flames.
I think I need to work on my upper body strength.
 12575532134_27bfa0b9af_z.jpg for post 11684")
Now, pour the milk/yolk/vanilla mixture into the sifted dry ingredients…
 12575530524_85a01ef668_z.jpg for post 11684")
And very gently stir until they’re just about halfway combined.
 12575177743_c017725dbf_z.jpg for post 11684")
Then pour in the melted butter. Now, at first glance, a stick of melted butter may seem like a lot. And that is because a stick of melted butter IS a lot. There’s no getting around it. But from my understanding, this is what sets waffle batter apart from pancake batter: Waffle batter has a higher percentage of fat, which helps the waffles brown more lusciously in the waffle iron, and also helps with the lovely waffle texture. Some recipes use vegetable oil for the fat…but butter is more my wheelhouse, baby.
 12575076765_fe14abbc56_z.jpg for post 11684")
Again, very gently stir in the butter until it’s just combined.
 12575073445_bdec2f273c_z.jpg for post 11684")
At the very end, pour in the beaten whites (and remember: yours will be more stiff than these)…
 12575172103_fc9c78a50b_z.jpg for post 11684")
And gently fold the whites into the batter. And by “fold” I definitely mean fold. No vigorous stirring allowed here!
 12575521994_422023e0a6_z.jpg for post 11684")
Stop just short of the whites being totally mixed in.
What a nice batter!
 12575069915_6496caaedd_z.jpg for post 11684")
Pour the batter into the preheated waffle iron…
 12575168293_02eea49fb2_z.jpg for post 11684")
Then cook it for its recommended time, which is usually longer than you think it’s going to take. I didn’t let mine go the whole time, but it did turn out to be a good 4-plus minutes.
In other news…I just can’t get away from these repeating numbers.
But that’s another story for another time.
 12575067175_4b900efd16_z.jpg for post 11684")
You need that time to ensure that the waffles are nice and deep, deep golden brown and crisp.
 12575517224_94c955c728_z.jpg for post 11684")
Oh, man. I love life.
 12575163173_ce49b76eeb_z.jpg for post 11684")
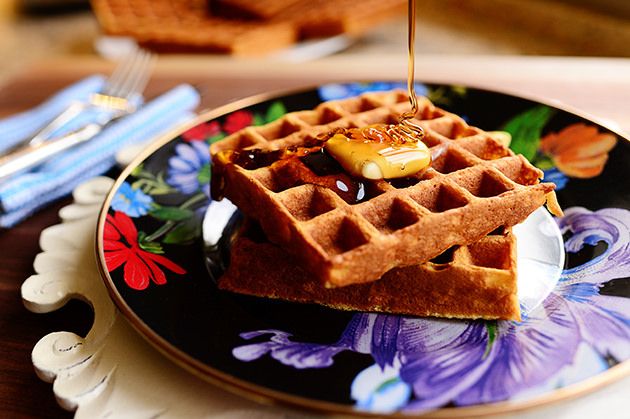
Now, here’s the most important thing about waffles: You have to serve them immediately. As in, the second they come out of the waffle iron!
 12575059805_beeedd4839_z.jpg for post 11684")
So have the extra butter ready…
 12575157383_01a50269e0_z.jpg for post 11684")
As well as the warm syrup.
Now, I just said this, but it bears repeating: I love life.
 12575502654_14435584be_z.jpg for post 11684")
I’m not kidding. I want to marry life.
And these waffles can be my maid of honor.
That was quite possibly the worst metaphor I’ve come up with in quite some time.
But these waffles will definitely make up for it.
Here’s the handy dandy printable!